Welcome to part 5 of the Design Patterns series.
This episode will be about the State Pattern!
State Pattern
State is a behavioral design pattern that lets an object alter its behavior when its internal state changes. It appears as if the object changed its class.
State pattern is a very commonly used design pattern most use unknowingly. But can be used to it’s full potential if you start to recognise it as a state pattern!
Examples
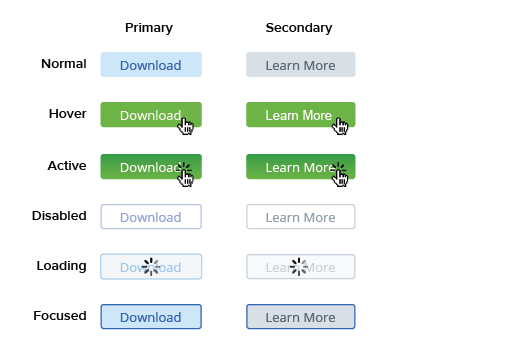
Buttons
Buttons always have at least 2 states. Normal and active. Whenever a button changes a state it changes visually to scale, darken and/or change image. But can also add new functional like adding a loading state will disable intractability and show a loading graphic.
Character animations
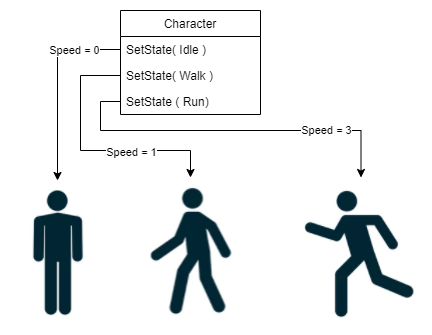
A typical use for states pattern in game development is a character animations state. Whenever a character is falling, it will go into “falling” state and animate the falling animation. Once the character hits the ground it can either go directly to “idle” state or when you add damage, go to “fall-damaged” state. But also whenever a character is running left/right in a side scroller game. The character can determine its x scale being 1 or -1 based on their state being “running-left” or “running-right”.
The state can be determined from different resources. Mostly from pressing buttons, but can also be overwritten by internal data. Speed for example; The speed a character is walking can determine it’s state. 0 is idle, 1 is walking and when reaching 3 the character is running.
Intentions of using State Pattern
- Encapsulate behaviour for the same object, based on its internal state.
Demo
Demo introduction
In this demo we will continue with where we left previous episode!
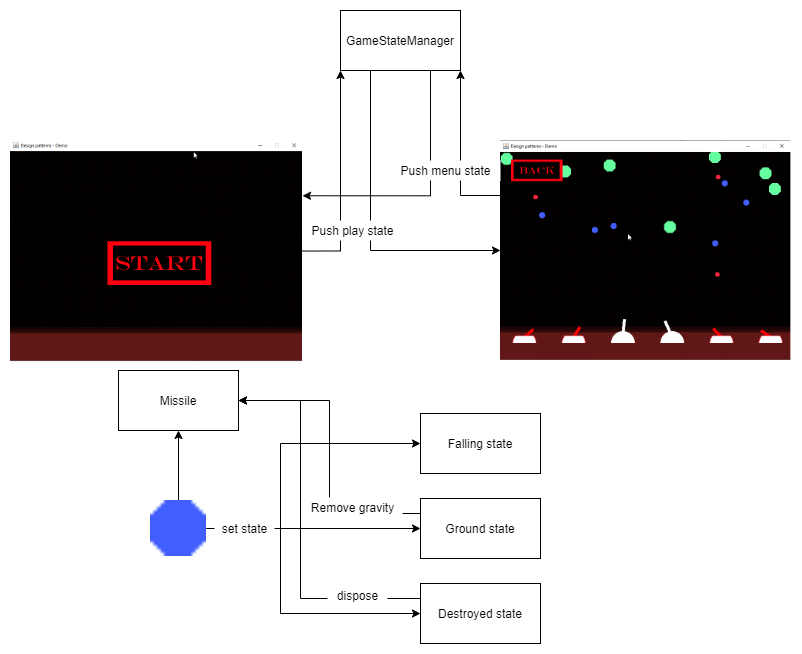
We will add a menu state machine. Which is a manager handing two states; MenuState and PlayState. Which will render either the main menu or our game where all the missiles will fall and all the turrets will be rendered.
Code
Note: In some examples, dots indicating code which is written in previous episode to highlight what’s new. If wanting to have full code, check out previous episode or GitHub link below!
Missile States
Currently we already sort of added a state pattern to our missile code! We added an isStopped boolean when it hits the ground. But we can clearify this code by using an enum.
MissileState.java
In the missile state enum we can declare all states
package missile;

public enum MissileState {
	Falling,
	Destroyed,
	Ground
}
Missile.java
Now we have the states enum, we can apply on our missile code.
package missile;

...

public abstract class Missile extends Entity {

	...

    // current state, every missile starts with falling, so this is it's default state
	private MissileState state = MissileState.Falling;

	...

    // instead of setting a boolean, we can also return based on our current state
	public boolean isStopped() { return state == MissileState.Ground; }

	...

	private void setState(MissileState state) {
		this.state = state;

		// check new state to apply change to our current behaviour
		if(state == MissileState.Ground) {
			// gravity is not needed anymore when we hit the ground
			removeComponent(Gravity.class);
		}
	}

    // preparation for future episode!
	public void destroy() {
		// TODO: destroy the missile somehow ;)
		setState(MissileState.Destroyed);
	}

	public void update(double deltaTime) {
		// update all components
		super.update(deltaTime);

		// stop checking position when not falling
		if(state != MissileState.Falling) {
			return;
		}

		// check if reached the ground
		Transform transform = getComponent(Transform.class);
		Vector2 pos = transform.position;
		if(pos.y >= 500) {
			pos.y = 500;

            // apply new state
			setState(MissileState.Ground);
		}

		transform.position = pos;
	}
}
Buttons
Buttons are a typical example of using state machine.
Because we don’t have native buttons in this Java project, we will develop them ourselves!
ButtonState.java
package ui;

public enum ButtonState {
	Normal,
	Hover,
	Pressed
}
Button.java
In this example you’ll notice that the state is fully internally required and handled. We make our lives as developers easier to read the exact state using the enum. This way we can easy follow what state show what.
package ui;

import java.awt.event.MouseEvent;
import java.awt.event.MouseMotionListener;
import java.awt.image.BufferedImage;

import javax.swing.Action;
import javax.swing.event.MouseInputListener;

import components.Image;
import components.ImageCollider;
import components.Transform;
import ecs.Entity;
import main.GameWindow;

public class Button extends Entity implements MouseInputListener, MouseMotionListener {

	// components
	private Transform transform;
	private Image image;
	private ImageCollider collider;


	// three state graphics
	private BufferedImage normal;
	private BufferedImage hover;
	private BufferedImage pressed;

	// current state
	private ButtonState state;
	private boolean mousePressed;

	// action when button is clicked
	private Action action;

	public Button(float x, float y, BufferedImage normal, BufferedImage hover, BufferedImage pressed) {
		this.normal = normal;
		this.hover = hover;
		this.pressed = pressed;

		transform = new Transform(x, y);
		addComponent(transform);

		image = new Image(normal);
		addComponent(image);

		collider = new ImageCollider();
		addComponent(collider);

		GameWindow.instance.addMouseListener(this);
		GameWindow.instance.addMouseMotionListener(this);
	}

	// set action when this button is clicked
	public void setOnClickAction(Action action) {
		this.action = action;
	}

	public void setScale(float scale) {
		image.setScale(scale);
	}

	// retrieve button image based on state
	private BufferedImage getStateImage() {
		if(state == ButtonState.Pressed) {
			return pressed;
		}

		return state == ButtonState.Hover ? hover : normal;
	}

	// checking current conditions to change state
	private void checkState(MouseEvent e) {
		ButtonState cachedState = state;

		if(collider.Collides(e.getX() - 8, e.getY() - 32)) {
			// hit!
			if(mousePressed) {
				state = ButtonState.Pressed;
			} else {
				state = ButtonState.Hover;
			}
		} else {
			state = ButtonState.Normal;
		}

		if(cachedState != state) {
			image.setSprite(getStateImage());
		}
	}

	private void onClick() {
		if(state == ButtonState.Pressed) {
			// fire action, no parameters are required
			action.actionPerformed(null);
		}
	}

	public void dispose() {
		GameWindow.instance.removeMouseMotionListener(this);
		GameWindow.instance.removeMouseListener(this);
	}

	@Override
	public void mouseMoved(MouseEvent e) {
		checkState(e);
	}

	@Override
	public void mousePressed(MouseEvent e) {
		mousePressed = true;
		checkState(e);
	}

	@Override
	public void mouseReleased(MouseEvent e) {
		onClick();
		mousePressed = false;
		checkState(e);
	}

	@Override
	public void mouseDragged(MouseEvent e) {
	}

	@Override
	public void mouseClicked(MouseEvent e) {
	}

	@Override
	public void mouseEntered(MouseEvent e) {
	}

	@Override
	public void mouseExited(MouseEvent e) {
	}
}
ImageCollider.java
Because we must detect if we press the button yes or no, we’ll need a collider component. This will also come in handy when we going to create the explosion bullets!
package components;

import java.awt.Graphics2D;
import java.awt.Point;

import ecs.Component;

public class ImageCollider extends Component {

	private Image image;

	@Override
	public void init() {
		image = entity.getComponent(Image.class);
	}

	public boolean Collides(Point point) {
		return point.x <= image.getRect().getMaxX() && point.x >= image.getRect().getMinX() &&
				point.y <= image.getRect().getMaxY() && point.y >= image.getRect().getMinY();
	}

	public boolean Collides(float x, float y) {
		return x < image.getRect().getMaxX() && x > image.getRect().getMinX() &&
				y < image.getRect().getMaxY() && y > image.getRect().getMinY();
	}

	public boolean Collides(Image img) {
		return image.getRect().intersects(img.getRect());
	}

	@Override
	public void update(double deltaTime) {
	}

	@Override
	public void render(Graphics2D g) {
	}

}
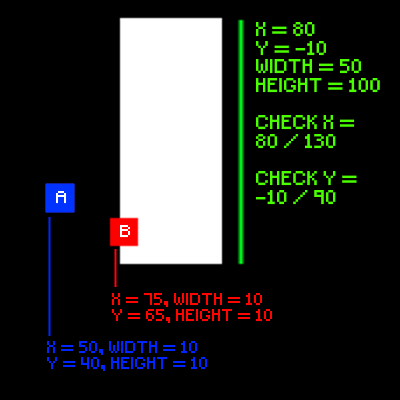
See image above for simple explanation of collision detection.
Also further explained here. (click here)
Game States
Now we have our buttons we can make game states which allows us to navigate through menu and game.
GameState.java
Abstract state which we will handle in manager later
package gamestate;

import java.awt.Graphics2D;

public abstract class GameState {

	protected GameStateManager gsm;

	public GameState(GameStateManager gsm){
		this.gsm = gsm;
	}

	public abstract void init();
	public abstract void update(double deltaTime);
	public abstract void render(Graphics2D g);
	public abstract void dispose();

}
MenuState.java
A very simple state with only a button to enter play state
package gamestate.states;

import java.awt.Graphics2D;
import java.awt.event.ActionEvent;

import javax.swing.AbstractAction;

import gamestate.GameState;
import gamestate.GameStateManager;
import sprite.Sprites;
import ui.Button;

public class MenuState extends GameState {

	private Button btnStart;

	public MenuState(GameStateManager gsm) {
		super(gsm);
	}

	@Override
	public void init() {
		// create start button
		btnStart = new Button(800 / 2, 600 / 2,
				Sprites.instance.getBtnStartNormal(),
				Sprites.instance.getBtnStartHover(),
				Sprites.instance.getBtnStartPressed());

		btnStart.setOnClickAction(new OpenPlayState());
	}

	// internal class to handle button action. Java doesn't allow lambda expressions as
  	// well known in C#, so this is a work-around option ;)
	private class OpenPlayState extends AbstractAction {

		@Override
		public void actionPerformed(ActionEvent e) {
			gsm.setState(new PlayState(gsm));
		}
	}

	@Override
	public void update(double deltaTime) {
		btnStart.update(deltaTime);
	}

	@Override
	public void render(Graphics2D g) {
		btnStart.render(g);
	}

	@Override
	public void dispose() {
		btnStart.dispose();
	}

}
PlayState.java
What previously was handled in gameloop is now fully configured in our play state. Which makes much more sense.
Yes, this is still too much logic for a simple state. But it’s a highlight what’s changing.
package gamestate.states;

import java.awt.Graphics2D;
import java.awt.event.ActionEvent;
import java.util.ArrayList;
import java.util.List;
import java.util.Random;

import javax.swing.AbstractAction;

import gamestate.GameState;
import gamestate.GameStateManager;
import missile.Missile;
import missile.MissileFactory;
import sprite.Sprites;
import turret.TurretBase;
import turret.TurretFactory;
import ui.Button;

public class PlayState extends GameState {

	private static final int normalMissilesCount = 10;
	private static final int fastMissilesCount = 5;
	private static final int slowMissilesCount = 15;
	private static final int randomMissilesCount = 0;

	private static final boolean loopCreations = true;

	private MissileFactory missileFactory;
	private Random random;
	private Button backBtn;

	private ArrayList<Missile> missiles = new ArrayList<Missile>();
	private ArrayList<Missile> keepMissilesAlive = new ArrayList<Missile>();

	private ArrayList<TurretBase> turrets = new ArrayList<TurretBase>();

	private float randomX() {
		return 10 + random.nextFloat() * (750);
	}

	private float randomY() {
		return random.nextFloat() * (-500);
	}

	public PlayState(GameStateManager gsm) {
		super(gsm);

		missileFactory = new MissileFactory(normalMissilesCount, fastMissilesCount, slowMissilesCount);
		random = new Random();
	}

	@Override
	public void init() {

		int size = normalMissilesCount + fastMissilesCount + slowMissilesCount + randomMissilesCount;
		for (int i = 0; i < size; i++) {
			float x = randomX();
			float y = randomY();

			missiles.add(missileFactory.getMissile(x, y, i));
		}

		TurretFactory turretFactory = new TurretFactory();
		int turretCount = 6;
		for (int i = 0; i < turretCount; i++) {
			float x = ((800 / turretCount) / 2) + i * (800 / turretCount);
			turrets.add(turretFactory.getTurret(x, 500, i, turretCount));
		}

		backBtn = new Button(100, 50,
				Sprites.instance.getBtnBackNormal(), Sprites.instance.getBtnBackHover(), Sprites.instance.getBtnBackPressed());
		backBtn.setScale(0.5f);

		backBtn.setOnClickAction(new OpenMenuState());
	}

	// internal class to handle button action. Java doesn't allow lambda expressions as
  	// well known in C#, so this is a work-around option ;)
	private class OpenMenuState extends AbstractAction {

		@Override
		public void actionPerformed(ActionEvent e) {
			gsm.setState(new MenuState(gsm));
		}
	}

	@Override
	public void update(double deltaTime) {
		List<Missile> removeMissiles = new ArrayList<Missile>();

		for (TurretBase turret : turrets) {
			turret.update(deltaTime);
		}

		for (Missile missile : missiles) {
			missile.update(deltaTime);

			if(missile.isStopped()) {
				removeMissiles.add(missile);
			}
		}

		loopCreations(removeMissiles);

		if(backBtn != null) {
			backBtn.update(deltaTime);
		}
	}

	private void loopCreations(List<Missile> removeMissiles) {
		if(!loopCreations) {
			return;
		}

		if(removeMissiles.size() > 0) {
			missiles.removeAll(removeMissiles);
			keepMissilesAlive.addAll(removeMissiles);
			for (int i = 0; i < removeMissiles.size(); i++) {
				missiles.add(missileFactory.getMissile(randomX(), randomY(), removeMissiles.get(i).getCreationType()));
			}
		}

		while (keepMissilesAlive.size() > 15) {
			keepMissilesAlive.remove(0); // removing missile when it reached a limit for performance
		}
	}

	@Override
	public void render(Graphics2D g) {
		for (TurretBase turret : turrets) {
			turret.render(g);
		}

		for (Missile missile : missiles) {
			missile.render(g);
		}

		for (Missile missile : keepMissilesAlive) {
			missile.render(g);
		}

		if(backBtn != null) {
			backBtn.render(g);
		}
	}

	@Override
	public void dispose() {
		backBtn.dispose();

		for (TurretBase turret : turrets) {
			turret.dispose();
		}

		missiles.clear();
		turrets.clear();
		keepMissilesAlive.clear();
	}

}
GameStateManager.java
package gamestate;

import java.awt.Graphics2D;
import java.util.Stack;

public class GameStateManager {

	// stack is a great usage for this because we can stack our states
	// and push new states to top to make them active
	public Stack<GameState> states = new Stack<GameState>();

	public void init() {
		states.peek().init();
	}

	public void update(double deltaTime){
		states.peek().update(deltaTime);
	}

	public void render(Graphics2D g){
		states.peek().render(g);
	}

	public void setState(GameState state) {
		GameState matchState = null;
		for (GameState gameState : states) {
			if(gameState.getClass() == state.getClass()) {
				matchState = gameState;
			}
		}

		// size check because states can be empty on first call
		if(states.size() != 0) {
			System.out.println("dispose!");
			states.peek().dispose();
		}

		if(matchState != null) {
			// match found
			states.push(matchState);
			System.out.println("push back old state");
		} else {
			// no match found, add parameter state
			states.push(state);
			System.out.println("push state");
		}
		init();
	}
}
Using game states
GameLoop.java
Now we have our game states, all we have to do in our game loop is updating the game state manager (gsm).
package loop;

import java.awt.image.BufferedImage;

import gamestate.GameStateManager;
import gamestate.states.MenuState;
import sprite.Sprites;

public class GameLoop  extends Loop {

	private BufferedImage background;

	private GameStateManager gsm;

	public GameLoop(int width, int height) {
		super(width, height);
	}

	@Override
	public void init() {
		super.init();

		Sprites sprites = new Sprites();
		sprites.Init(); // creates singleton instance and sprites

		gsm = new GameStateManager();
		gsm.setState(new MenuState(gsm)); // menu default state

		background = Sprites.instance.getBG();
	}

	@Override
	public void tick(double deltaTime) {
		gsm.update(deltaTime);
	}

	@Override
	public void render() {
		graphics2D.drawImage(background, 0, 0, null);
		gsm.render(graphics2D);
		clear();
		super.render();
	}

	@Override
	public void clear() {
		super.clear();
	}

}
Now we have our game states working!
Source code – GitHub
You can get all source codes here!
https://github.com/jscotty/DesignPatterns/tree/StatePattern
Breakdown
We’ve done quite a while this time. By adding state pattern we were able to clean some code up and adding menu/play states. Which often are seen as Scenes.

We gained some, but also added some. We cleaned up our game loop and separated our play states as if they are scenes.
First glimpsed it looks like we added too much code, which is partially correct, but we’ll clean up more next episode! But these codes also contains additions of buttons, comments and visual adjustments with rendering backgrounds. And if we wouldn’t use the state pattern for the scene management (gsm), we would have had much more code just in the GameLoop 😉.
Note
In this example I keep a lot of the state management internal in their classes. This isn’t always the case for State Pattern usage.
I would highly recommend to read Game Programming Patterns book I highlighted below!
Resources
State pattern is pretty much straight forward. If wanting a more in depth explanation in video, check out Derek Banas once again!
Derek Banas
Game programming patterns
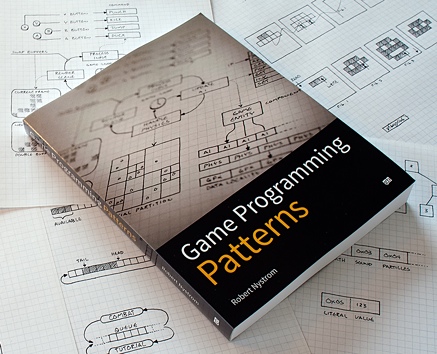
In game programming patterns book, Robert Nystrom has a great and well explained example of how to apply state pattern to your character.
http://gameprogrammingpatterns.com/state.html
Hope you enjoyed this episode!
Did you already used state pattern in your project(s)? Let me know! 😄
If any questions, feel free to message me on Instagram @justinbieshaar or in comments below!
Happy coding everyone! 👨💻
Greetings,
Justin Scott
Leave a Reply