


Welcome to part 3 of the Design Patterns series.
This episode will be about the Factory Pattern!
Factory Pattern

Factory Pattern or Factory Method Pattern says that just define an interface or abstract class for creating an object but let the subclasses decide which class to instantiate. In other words, subclasses are responsible to create the instance of the class.
Factory Pattern also known as Factory Method Pattern is a creational pattern used to create objects which share the same base class. It’s a very commonly used pattern for games because games often have sets of subclasses. Think of enemies, weapons but also shop or vanity items.
Examples
Just like in real life, we have factories building our products.
This is the exact same thinking you need to have when building factories in your project.
Car Factory
Imagine having a car dealership. If a customer comes in to order a new car, the sales man will contact with the car factory to build one.
The sales man delivers a form with the specifications and the factory will determine which subclass based on car it will be. When it found the correct specified car, it will return it back to the sales man.
Enemy Factory
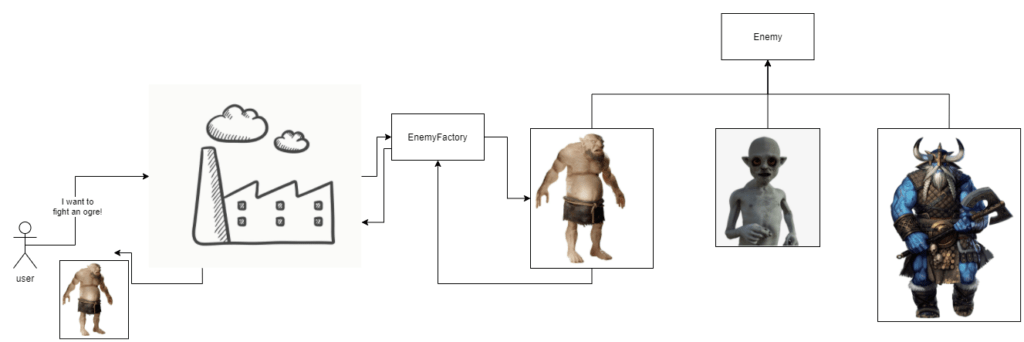
When you build a game which has multiple types of enemies. Like; Orgs, Goblins and Giants. Each enemy is based on their base class called Enemy. The enemy factory will come to place to select which enemy it has to return. The Org, Goblin or Giant will define their logic but will always be seen as an enemy.
This will prevent repeatable code when enemies will be created from multiple sources.
Intentions of using Factory Pattern
- Split logic of creating and instantiating objects.
- Prevents repeatable code by encapsulate object creation.
- To have a central access point knowing about every subclasses.
Demo
Demo introduction
For this demo we will create the missiles.
We’ll make three missiles for the Factory to return. A small/fast missile, normal missile and big/slow missile.
What we’ll do step by step:
- We’ll create a java window
- Create a runnable loop to render our objects
- Make a missile base class
- Make missiles child classes
- Small/Fast
- Normal
- Big/Slow
- Create factory to handle missile instantiation
- Loop missiles endlessly.
Setup
For this demo I used Java “15.0.1”

Eclipse IDE for Java Developers
Version: 2020-03 (4.15.0)
Build id: 20200313-1211
In case you think the convention I used for this demo. Code conventions are based on oracle’s base conventions documented here:
https://www.oracle.com/technetwork/java/codeconventions-150003.pdf
Code
Game window and loop
For the game window and loop I took my old code I made when I was a student 6 years ago. I made back then a JavaGameOperator which I used to make a few test assignments and personal projects in college.
These codes were inspired from RealTutsGML youtube series about Java Game Delopment.
You can watch this series here if you are fully interested:
Main.java
package main;

import loop.GameLoop;

public class Main {

	// defining width and height of our window
	public static int width = 800;
	public static int height = 600;

	public static void main(String[] args) {
		// create game window with title and size
		GameWindow gameWindow = new GameWindow("Design patterns - Demo", width, height);
		// create runnable code to loop and render
		gameWindow.add(new GameLoop(width, height, gameWindow));
		// enable the window
		gameWindow.setVisible(true);
	}

}
GameWindow.java
A very simple GameWindow based on java native JFrame. We’ll use this to render our game.
package main;

import javax.swing.JFrame;
import javax.swing.JMenu;
import javax.swing.JMenuBar;

public class GameWindow extends JFrame{

	// a simple game window extending from java native JFrame
	// showing a title and defining size
	public GameWindow(String title, int width, int height){
		setTitle(title);
		setSize(width, height);

		setLocationRelativeTo(null);
		setDefaultCloseOperation(JFrame.EXIT_ON_CLOSE);
		setResizable(false);
		setVisible(true);
	}
}
Loop.java
Loop will be our main runnable code which our GameLoop extends from. This loop will be responsible of calling updates and rendering objects using Graphics2D
package loop;

import java.awt.Dimension;
import java.awt.Graphics;
import java.awt.Graphics2D;
import java.awt.image.BufferedImage;

import javax.swing.JPanel;

public class Loop extends JPanel implements Runnable{

	private Thread thread;
	private boolean running;

	private int fps; //frames per second
	private int tps; //ticks per second

	private int width;
	private int height;

	public Graphics2D graphics2D;
	private BufferedImage img;

	public static double currentFPS = 120D;

	public Loop(int width, int height){
		this.width = width;
		this.height = height;

		setPreferredSize(new Dimension(width, height));
		setFocusable(false);
		requestFocus();
	}

	// initializing
	public void init() {
		img = new BufferedImage(width, height, BufferedImage.TYPE_INT_RGB);
		graphics2D = (Graphics2D) img.getGraphics();

		running = true;
	}

	// starting thread
	@Override
	public void addNotify() {
		super.addNotify();

		if(thread == null){
			thread = new Thread(this);
			thread.start();
		}
	}

	// runnable code
	@Override
	public void run() {
		init();

		// caching time variables
		long lastTime = System.nanoTime();
		double nsPerTick = 1000000000D / currentFPS;
		int frames = 0;
		int ticks = 0;
		long lastTimer = System.currentTimeMillis();
		double deltaTime = 0;

		while(running){
			long now = System.nanoTime();
			deltaTime += (now - lastTime) / nsPerTick;
			lastTime = now;
			boolean shouldRender = false;

			while(deltaTime >= 1){
				ticks++;

				// tick + deltatime
				tick(deltaTime);

				deltaTime--;
				shouldRender = true;
			}

			if(shouldRender){
				frames++;
				//render
				render();
			}

			try {
				Thread.sleep(2);
			} catch (InterruptedException e) {
				e.printStackTrace();
			}

			if(System.currentTimeMillis() - lastTimer >= 1000){
				lastTimer += 1000;
				tps = ticks;
				fps = frames;
				frames = 0;
				ticks = 0;
			}
		}

	}

	// used as virtual method
	public void tick(double deltaTime) {
	}

	// rendering graphics
	public void render() {
		graphics2D.clearRect(0, 0, width, height);
	}

	// clear frame
	public void clear(){
		Graphics g2 = getGraphics();

		if(img!=null){
			g2.drawImage(img,0,0,null);
		}
		g2.dispose();
	}

	// getter properties
	public int getFps() {
		return fps;
	}
	public int getTps() {
		return tps;
	}
}
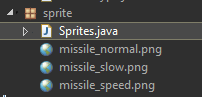
Sprites.java
Sprites class is used to get our images. Sprite class is a singleton class with a central global access point for all classes to access.
package sprite;

import java.awt.image.BufferedImage;
import java.io.IOException;
import java.net.URL;

import javax.imageio.ImageIO;

public class Sprites {

	public static Sprites instance; // singleton

	// missiles
	private static BufferedImage missile_normal;
	private static BufferedImage missile_speed;
	private static BufferedImage missile_slow;

	// properties
	public BufferedImage GetMissileNormal() { return missile_normal; }
	public BufferedImage GetMissileSpeed() { return missile_speed; }
	public BufferedImage GetMissileSlow() { return missile_slow; }

	public void Init() {
		instance = this;

		// loading images
		missile_normal = loadImageFrom("missile_normal");
		missile_speed = loadImageFrom("missile_speed");
		missile_slow = loadImageFrom("missile_slow");
	}

	private BufferedImage loadImageFrom(String path){
		// creating url from this class path position
		URL url = this.getClass().getResource(path + ".png");
		BufferedImage img = null;

		try{
			img = ImageIO.read(url);
		} catch(IOException e){
			e.printStackTrace();
		}

		// return image if found
		return img;
	}
}
We load everything from our Sprites class package folder, so this is also the location where we store all our assets!
For now I’ve already added all the images.
Missile code
Missile.java
package missile;

import java.awt.Graphics2D;
import java.awt.image.BufferedImage;

import math.Vector2;

public abstract class Missile  {
	// pivot for object drawing
	private static final float pivotX = 0.5f;
	private static final float pivotY = 0.5f;

	// entity data
	private Vector2 pos;
	private float speed;
	private int score;
	private BufferedImage image;

	private int width;
	private int height;

	// render size for scaling
	private int renderWidth;
	private int renderHeight;

	// when reached the ground
	private boolean stopped;

	// used to recreate
	private MissileType creationType;

	public float getSpeed() { return speed; }

	public Vector2 getPos() { return pos; }

	public int getScore() { return score; }

	public boolean isStopped() { return stopped; }

	public MissileType getCreationType() { return creationType; }

	// Constructor
	public Missile(float x, float y, float speed, int score, BufferedImage image) {
		this.speed = speed;
		this.image = image;

		width = image.getWidth();
		height = image.getHeight();

		renderWidth = width;
		renderHeight = height;

		pos = new Vector2(x, y);
	}

	// set creation type which is used to recreate this missile
	public void setCreationType(MissileType type) {
		creationType = type;
	}

	// scale missile
	protected void setScale(float scale) {
		renderWidth = (int) (width * scale);
		renderHeight = (int) (height * scale);
	}

	// update missile to move it to the ground
	public void update(double deltaTime) {
		pos.yPos += (float)(speed * deltaTime);
		if(pos.yPos >= 500) {
			pos.yPos = 500;

			stopped = true;
		}
	}

	public void render(Graphics2D g) {
		// pivoting
		int x = (int) (pos.xPos - (renderWidth * pivotX));
		int y = (int) (pos.yPos - (renderHeight * pivotY));
		g.drawImage(image, x, y, renderWidth, renderHeight, null);
	}
}
MissileNormal.java
package missile;

import sprite.Sprites;

public class MissileNormal extends Missile {
	// defining speed
	private static final float speed = 1f;

	public MissileNormal(float x, float y) {
		super(x, y, speed, 2, Sprites.instance.GetMissileNormal());
	}
}
MissileFast.java
package missile;

import sprite.Sprites;

public class MissileFast extends Missile {
	// defining speed
	private static final float speed = 1.5f;

	public MissileFast(float x, float y) {
		super(x, y, speed, 3, Sprites.instance.GetMissileSpeed());

		setScale(.75f);
	}
}
MissileSlow.java
package missile;

import sprite.Sprites;

public class MissileSlow extends Missile {
	// defining speed
	private static final float speed = .8f;

	public MissileSlow(float x, float y) {
		super(x, y, speed, 2, Sprites.instance.GetMissileSlow());

		setScale(2);
	}
}
Now we have all our types specified and linked to our Missile base class. Each missile defines it’s speed, score when destroyed and render image.
To help our factory a little bit, we’ll also create an enum for all our types.
MissileType.java
package missile;

public enum MissileType {
	Normal,
	Slow,
	Fast
}
Factory
Now we have all elements to code and use our factory! 😁
MissileFactory.java
package missile;
public class MissileFactory {
private int normalMissilesCount;
private int fastMissilesCount;
private int slowMissilesCount;
public MissileFactory(int normalCount, int fastCount, int slowCount) {
normalMissilesCount = normalCount;
fastMissilesCount = fastCount;
slowMissilesCount = slowCount;
}
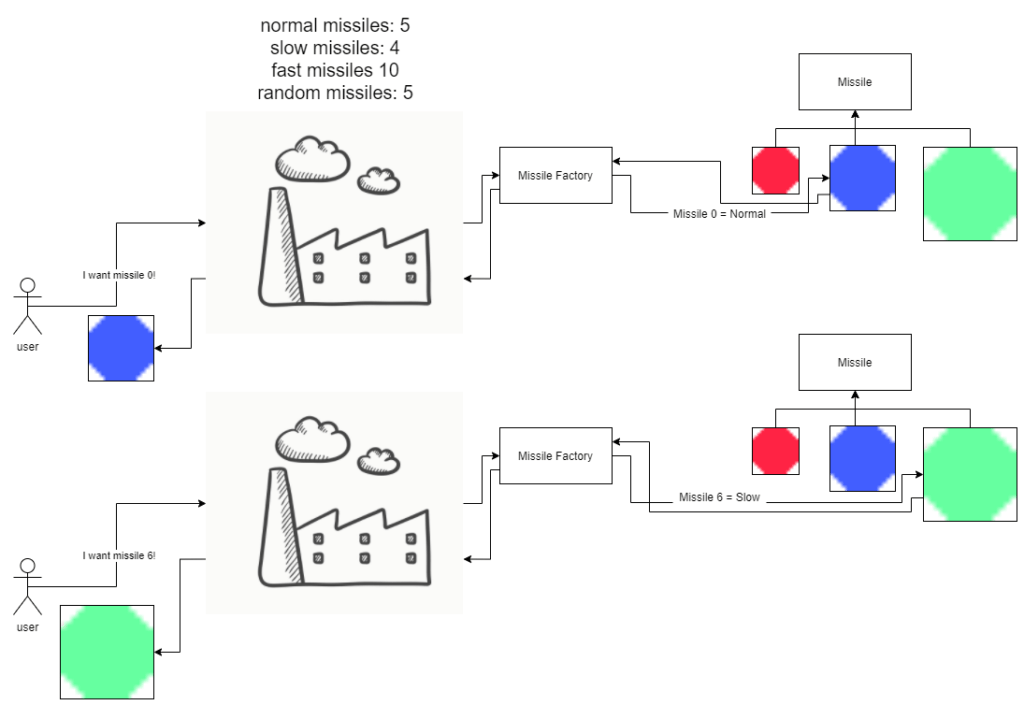
public Missile getMissile(float x, float y, int index) {
MissileType type = null;
if(index < normalMissilesCount) {
type = MissileType.Normal;
} else if(index < normalMissilesCount + fastMissilesCount) {
type = MissileType.Fast;
} else if(index < normalMissilesCount + fastMissilesCount + slowMissilesCount) {
type = MissileType.Slow;
}
return getMissile(x, y, type);
}
public Missile getMissile(float x, float y, MissileType type) {
Missile result = null;
switch (type) {
case Normal:
result = new MissileNormal(x, y);
break;
case Fast:
result = new MissileFast(x, y);
break;
case Slow:
result = new MissileSlow(x, y);
break;
default:
result = getMissileRandom(x, y);
break;
}
result.setCreationType(type);
return result;
}
public Missile getMissileRandom(float x, float y) {
double percentage = Math.random() * 100;
if(percentage < 33) {
return new MissileFast(x, y);
} else if(percentage < 66) {
return new MissileSlow(x, y);
} else {
return new MissileNormal(x, y);
}
}
}
GameLoop.java
Now we developed our Factory, we can finally use is!
For the sake of this demo, I decided to keep all Factory logic in de GameLoop class. In future episodes you’ll see this splitting up highlighting other patterns optimal usage.
package loop;

import java.util.ArrayList;
import java.util.Random;

import missile.Missile;
import missile.MissileFactory;
import sprite.Sprites;

public class GameLoop  extends Loop {

	// missiles count
	// this data is used for our factory.
	// in this configuration our factory will make sure there
	// are always 10 normal, 5 fast, 15 slow and no random missiles on
	// screen.
	private static final int normalMissilesCount = 10;
	private static final int fastMissilesCount = 5;
	private static final int slowMissilesCount = 15;
	private static final int randomMissilesCount = 0;

	// enabling to loop recreating missiles after they reach the ground
	private static final boolean loopCreations = true;

	private MissileFactory factory;
	private Random random;

	// to keep track of our missiles
	private ArrayList<Missile> missiles = new ArrayList<Missile>();
	private ArrayList<Missile> keepMissilesAlive = new ArrayList<Missile>();

	// random positioning properties
	private float randomX() {
		return 10 + random.nextFloat() * (750);
	}

	private float randomY() {
		return random.nextFloat() * (-500);
	}


	public GameLoop(int width, int height) {
		super(width, height);

		// create factory instance
		factory = new MissileFactory(normalMissilesCount, fastMissilesCount, slowMissilesCount);
		random = new Random();
	}

	@Override
	public void init() {
		super.init();

		Sprites sprites = new Sprites();
		sprites.Init(); // creates singleton instance and sprites

		int size = normalMissilesCount + fastMissilesCount + slowMissilesCount + randomMissilesCount;
		// loop through all our indexes
		for (int i = 0; i < size; i++) {
			float x = randomX();
			float y = randomY();

			missiles.add(factory.getMissile(x, y, i));
		}
	}

	@Override
	public void tick(double deltaTime) {
		// update all our missiles
		ArrayList<Missile> removeMissiles = new ArrayList<Missile>();
		for (Missile missile : missiles) {
			missile.update(deltaTime);

			// add missile to removed list to not update, but keep rendering it
			if(missile.isStopped()) {
				removeMissiles.add(missile);
			}
		}

		if(!loopCreations) {
			return;
		}

		if(removeMissiles.size() > 0) {
			missiles.removeAll(removeMissiles);
			keepMissilesAlive.addAll(removeMissiles);
			for (int i = 0; i < removeMissiles.size(); i++) {
				missiles.add(factory.getMissile(randomX(), randomY(), removeMissiles.get(i).getCreationType()));
			}
		}

		// remove missiles when exceeding a size of 50
		// to prevent performance issues
		while (keepMissilesAlive.size() > 50) {
			// removing missile when it reached a limit for performance
			keepMissilesAlive.remove(0);
		}
	}

	@Override
	public void render() {
		// render all our instances!
		for (Missile missile : missiles) {
			missile.render(graphics2D);
		}
		for (Missile missile : keepMissilesAlive) {
			missile.render(graphics2D);
		}
		clear();
		super.render();
	}

	@Override
	public void clear() {
		super.clear();
	}
}
Source code – Github
You can get all source codes here!
https://github.com/jscotty/DesignPatterns/tree/FactoryPattern
Break down
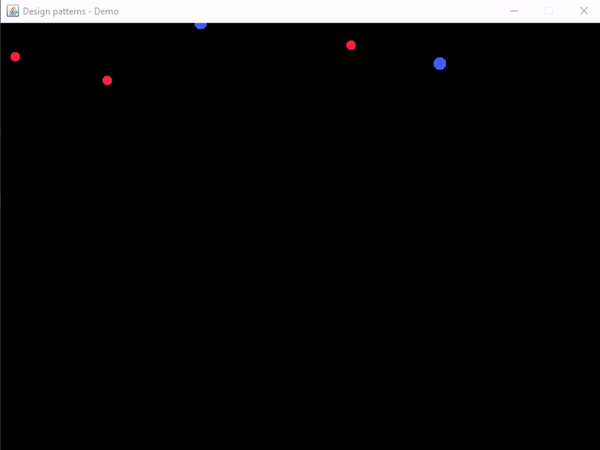
In this demo we made a factory that will spawn missiles for us! We give it data parameters to give it some logic to be able to return missiles based on an index.
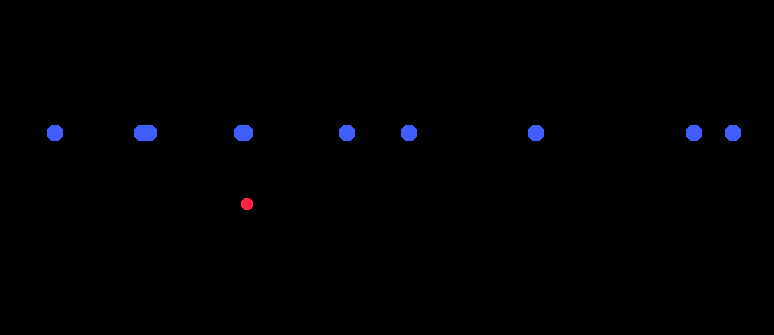
As in this screenshot, when we set normal missiles to 10, fast to 1, slow and random to 0. We’ll only see 10 normal missiles and 1 fast missile the whole time.
Try it yourself by changing the values 🙂
But also made the factory instantiating a missile based on type. Each time a missile hits the ground, we’ll pass it creation type to recreate the same missile!
Why passing creation type instead of defining the type in missile sub classes?
We use the creation type because the missiles can also be random. If we do it by subclass type, a random missile will remain it’s type when it’s recreated on reaching the ground. When using creation type, the factory knows it was generated randomly, and so returning a random missile again when it reaches the ground.
Resources
RealTutsGML
RealTutsGML Java Game Development series was the series I followed in 2016 while I was developing my Java Game Operator. To learn more about the JFrame and Loop/Runnable code, I’d recommend to follow this serie!
Derek Banas
Derek Banas has once again a great tutorial explaining basics of Factory Pattern!
Refactoring guru
https://refactoring.guru/design-patterns/factory-method
Hope you enjoyed this episode!
Did you already knew about the Factory Pattern? Or is this your first time reading about it?
I hope this episode helped you understanding the Factory Pattern and will make you use it sometimes when you need to instantiate objects from the same base class!
If any questions, feel free to message me on Instagram @justinbieshaar or in comments below!
Happy coding everyone! 👨💻
Greetings,
Justin Scott
Leave a Reply