Hello readers! 🙂
Welcome to part 3 of HTML5 build series. This episode we will create and use sprite sheets!
What are sprite sheets?
I would recommend to watch this video since it visualizes the perfect example of why we should use sprite sheets.
Somethings I would like to add to the video are:
- Sprite sheets reduce draw calls, each time we ask our processor to draw an image it makes a draw call. If we have 100 images it will mean our processor has to process at least 100 images! But if we group all 100 images in one sprite sheet. It will process only 1 draw call for all these 100 images.
- Sprite sheets are also great for our assets organization. Therefor I will not focus to much on increasing performance in this episode, but on organization of our referenced imaged and how to set up a quick and easy system to use sprite sheets.
The video is made for Texture Packer. Since Texture Packer is a premium product I will use a different sprite packer called Shoebox. You can download shoebox here: https://renderhjs.net/shoebox/. Shoebox is a great alternative but only does not put the images in order..
But since we can order it our selfs by code, it does not really matter. 😉
Lets start!
To begin this episode I want to start with our buttons. Currently we have several images for our buttons. We have images for normal, hover and pressed states. This means we have to process three images each time we want to interact with a button. Which does not sound really good.
To reduce it I made this sprite sheet:

This sprite sheet contains image for our medium sized buttons in lobby and game scene but also our small buttons for our player interactions!
How I created this sprite sheet:
- Open Shoebox.
- Select all files you want to use.
- Drag and drop all files into ‘Sprite Sheet’ section
- Select Advanced.
- Set ‘Template’ to pixi.js.
- Set file name to ‘buttons.json’.
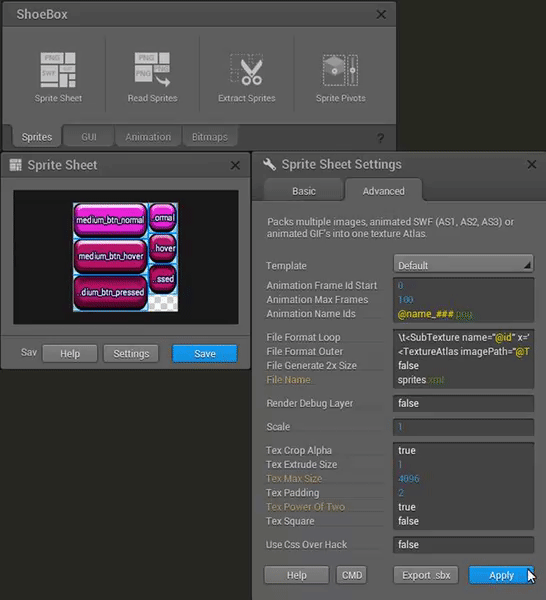
- Press ‘Apply’.
- Press ‘Save’.
- Look into the folder where you dragged and dropped your files from.
- Notice you have now a buttons.png and buttons.json added inside this folder.
When you open the buttons.json it should look something like this:
{
"frames": {
	"medium_btn_normal.png": {
		"frame": {"x":0, "y":0, "w":95, "h":45},
		"spriteSourceSize": {"x":0,"y":0,"w":95,"h":45},
		"sourceSize": {"w":95,"h":45}
	},
	"medium_btn_hover.png": {
		"frame": {"x":0, "y":46, "w":95, "h":45},
		"spriteSourceSize": {"x":0,"y":0,"w":95,"h":45},
		"sourceSize": {"w":95,"h":45}
	},
	"medium_btn_pressed.png": {
		"frame": {"x":0, "y":92, "w":95, "h":45},
		"spriteSourceSize": {"x":0,"y":0,"w":95,"h":45},
		"sourceSize": {"w":95,"h":45}
	},
	"small_btn_hover.png": {
		"frame": {"x":96, "y":0, "w":36, "h":38},
		"spriteSourceSize": {"x":0,"y":0,"w":36,"h":38},
		"sourceSize": {"w":36,"h":38}
	},
	"small_btn_norm.png": {
		"frame": {"x":96, "y":78, "w":36, "h":38},
		"spriteSourceSize": {"x":0,"y":0,"w":36,"h":38},
		"sourceSize": {"w":36,"h":38}
	},
	"small_btn_pressed.png": {
		"frame": {"x":96, "y":39, "w":36, "h":38},
		"spriteSourceSize": {"x":0,"y":0,"w":36,"h":38},
		"sourceSize": {"w":36,"h":38}
	}

},
"meta": {
	"image": "buttons.png",
	"size": {"w": 133, "h": 138},
	"scale": "1"
}
}
This is all the information about our images inside this sprite sheet.
Now to use this information we can use PIXI!
In the sprite sheet documentation of PIXI.spritesheet (http://pixijs.download/release/docs/PIXI.Spritesheet.html) they show an example of how to load a sprite sheet into the PIXI system.
PIXI.Loader.shared.add("images/spritesheet.json").load(setup);

function setup() {
  let sheet = PIXI.Loader.shared.resources["images/spritesheet.json"].spritesheet;
  ...
}
This means we have to change our code a little bit so our scenes know when they can access a sprite sheet. But since we can not call this method when it is already in process we will do it all in the beginning so it can not bother our game.
To access our sprite sheet we first have to update our references.js a little bit.
//helpers/references.js
...
var uiAssets = {
    mediumPinkButtons: {
        sheet: '_assets/buttons.json',
        normal: 'medium_btn_normal.png',
        hover: 'medium_btn_hover.png',
        pressed: 'medium_btn_pressed.png',
    },

    smallPinkButtons: {
        sheet: '_assets/buttons.json',
        normal: 'small_btn_norm.png',
        hover: 'small_btn_hover.png',
        pressed: 'small_btn_pressed.png',
    },
};
...
I made groups of our button images so we can reuse it easily by only passing a group as parameter. So each button can eventually call *parameter*.sheet/normal/hover/pressed to receive its desired information.
Now we have our information set for the button sprites. We can implement it in our system. First we have to add the Loader to our main.js:
//main.js
import SceneManager from './scenes/sceneManager.js';
import Menu from './scenes/menu.js';
import Game from './scenes/game.js';
import { sceneStates, uiAssets } from './helpers/references.js';

const renderer= new PIXI.Application({
    width: 800, height: 600, backgroundColor: 0x6cd6e0, resolution: window.devicePixelRatio || 1,
});
document.body.appendChild(renderer.view);


PIXI.Loader.shared
.add(uiAssets.mediumPinkButtons.sheet) // medium and small share same sheet
.load(function(){
    var sceneManager = new SceneManager(renderer);
    sceneManager.addScene(new Menu());
    sceneManager.addScene(new Game());

    sceneManager.renderScene(sceneStates.menu);

    renderer.ticker.add(function update(delta){
        sceneManager.update(delta);
    });
});
I now make the scenes load after the sprite sheets are loaded by PIXI. This way we prevent any sorting processing issues which might can appear when we will load them in run time.
Now we can access our sprite sheet in our button.js, so lets do it:
//helpers/button.js
export default class Button{
    //prev: constructor(scene, normal, pressed, hover){
    constructor(scene, sheetInformation){
        // getting all textures from sprite sheet
        var textures = PIXI.Loader.shared.resources[sheetInformation.sheet].textures;
        // get normal texture from textures
        var textureNormal = textures[sheetInformation.normal];
        // get pressed texture from textures
        var texturePressed = textures[sheetInformation.pressed];
        // get hover texture from textures
        var textureHover = textures[sheetInformation.hover];
        ...
    }

    ...
}
Now to create the button we only have to adjust in menu.js and game.js
//scenes/menu.js & scenes/game.js
// prev: this.button = new Button(this, uiAssets.buttonPinkNormal, uiAssets.buttonPinkPressed, uiAssets.buttonPinkHovered);
this.button = new Button(this, uiAssets.mediumPinkButtons);
Now we can adjust all assets easily by only adjusting the desired image names in references.js.
Animations
Not only is a sprite sheet useful for organization of our project and saving performance. It is also easy to loop through sprites to make an animation! When you read the sprite sheet API from pixi.js it says pixi.js animatedSprites are only supported by sprite sheets made by Texture Packer. This is because Texture Packer packs the sprites in order but Shoebox doesn’t.
Luckily we are programmers! So we can always make a work around. 😉
I want to make our character dance for us. So I made this sprite sheet for our character.

I named all sprite names in order from 1 to 9 so the json file looks like this:
{
"frames": {
	"character_1.png": {
		"frame": {"x":101, "y":0, "w":100, "h":100},
		"spriteSourceSize": {"x":0,"y":0,"w":100,"h":100},
		"sourceSize": {"w":100,"h":100}
	},
	"character_2.png": {
		"frame": {"x":202, "y":0, "w":100, "h":100},
		"spriteSourceSize": {"x":0,"y":0,"w":100,"h":100},
		"sourceSize": {"w":100,"h":100}
	},
	"character_3.png": {
		"frame": {"x":101, "y":202, "w":100, "h":100},
		"spriteSourceSize": {"x":0,"y":0,"w":100,"h":100},
		"sourceSize": {"w":100,"h":100}
	},
	"character_4.png": {
		"frame": {"x":101, "y":101, "w":100, "h":100},
		"spriteSourceSize": {"x":0,"y":0,"w":100,"h":100},
		"sourceSize": {"w":100,"h":100}
	},
	"character_5.png": {
		"frame": {"x":202, "y":101, "w":100, "h":100},
		"spriteSourceSize": {"x":0,"y":0,"w":100,"h":100},
		"sourceSize": {"w":100,"h":100}
	},
	"character_6.png": {
		"frame": {"x":0, "y":202, "w":100, "h":100},
		"spriteSourceSize": {"x":0,"y":0,"w":100,"h":100},
		"sourceSize": {"w":100,"h":100}
	},
	"character_7.png": {
		"frame": {"x":0, "y":101, "w":100, "h":100},
		"spriteSourceSize": {"x":0,"y":0,"w":100,"h":100},
		"sourceSize": {"w":100,"h":100}
	},
	"character_8.png": {
		"frame": {"x":101, "y":101, "w":100, "h":100},
		"spriteSourceSize": {"x":0,"y":0,"w":100,"h":100},
		"sourceSize": {"w":100,"h":100}
	},
	"character_9.png": {
		"frame": {"x":0, "y":0, "w":100, "h":100},
		"spriteSourceSize": {"x":0,"y":0,"w":100,"h":100},
		"sourceSize": {"w":100,"h":100}
	}

},
"meta": {
	"image": "character.png",
	"size": {"w": 303, "h": 303},
	"scale": "1"
}
}
Now knowing this information I added a new group to our references.js:
//helpers/references.js
...
var gameAssets = {
    background: '_assets/background.png',
    characterAnimation: {
        sheet: '_assets/character.json',
        frames: [
            'character_1.png',
            'character_2.png',
            'character_3.png',
            'character_4.png',
            'character_5.png',
            'character_6.png',
            'character_7.png',
            'character_8.png',
            'character_9.png',
        ],
        frameRate: 10,
    }
};
...
I made a new group with the sheet of the animation, all textures which each animation frame has to visualize and the frame rate of our animation.
Frame rate means in this case that our animation will change each 0.1 seconds from frame.
Because I added a new sprite sheet we have to add it again to our main.js Loader.
//main.js
...
import { sceneStates, uiAssets, gameAssets } from './helpers/references.js';
...

PIXI.Loader.shared
.add(uiAssets.mediumPinkButtons.sheet)
.add(gameAssets.characterAnimation.sheet) // < added
.load(function(){
    ...
});
So easy 😉
To make animations we got to make a new helper class which helps us changing sprite textures.
So I made this new helper class named spriteAnimation.js:
//helpers/spriteAnimation.js
export default class SpriteAnimation{
    constructor(scene, sheetInformation){
        // collecting all textures from sprite sheet
        this.textures = PIXI.Loader.shared.resources[sheetInformation.sheet].textures;
        // collecting all frames
        this.frames = sheetInformation.frames;
        // caching frame rate
        this.frameRate = sheetInformation.frameRate;

        this.frameIndex = 0;
        this.seconds = 0;

        this.sprite = new PIXI.Sprite(this.textures[this.frames[this.frameIndex]]);
        this.sprite.anchor.set(0.5);

        scene.addChild(this.sprite);
    }

    get x(){
        return this.sprite.x;
    }

    get y(){
        return this.sprite.y;
    }

    set x(value){
        this.sprite.x = value;
    }

    set y(value){
        this.sprite.y = value;
    }

    update(delta){
        // caching how many seconds have been passed
        this.seconds += delta;

        // if seconds passes or reaches our frame rate
        if(this.seconds >= this.frameRate){
            //change sprite
            this.sprite.texture = this.textures[this.frames[this.frameIndex]];

            //reset data
            this.seconds = 0;
            this.frameIndex++;
            if(this.frameIndex >= this.frames.length){
                this.frameIndex = 0;
            }
        }
    }

    destroy(){
        this.sprite.destroy();
    }
}
This way we can easily create new animations with any group added to our references.js using the template with a sheet, frames and frame rate!
Now to implement this animation we just have to replace the sprite creation in playerBase.js to sprite animation!
import SpriteAnimation from '../helpers/spriteAnimation.js';
export default class PlayerBase{
    //prev: constructor(scene, playerImage, xPos, yPos){
    constructor(scene, playerAnimation, xPos, yPos){
        //prev: var texturePlayer = PIXI.Texture.from(playerImage);
        //
        //this.player = new PIXI.Sprite(texturePlayer);
        this.player = new SpriteAnimation(scene, playerAnimation, xPos, yPos);

        // because we added get/set methods we are still able to adjust *.x and *.y like it is a sprite.
        this.player.x = xPos;
        this.player.y = yPos;
        ...
    }
    ...
}
Do not forget to replace the creation parameters of our player in game.js
//scenes/game.js
...
//prev: this.player = new Player(this, gameAssets.character, 400, 450);
this.player = new Player(this, gameAssets.characterAnimation, 400, 450);
...
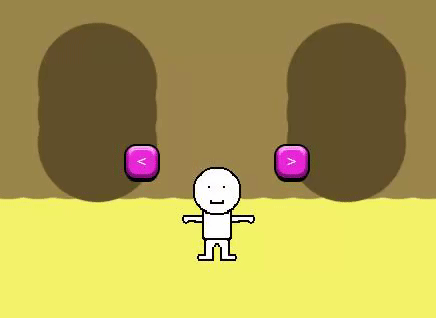
Look at that funky dance! 😀
Now we have buttons using sprite sheets and made our player do a funky dance, this episode is basically done!
But! I want to add this to our bonus from part 2!
Extra
In part 2 I made some artifacts by floating clouds around. This time using sprite sheet we can add some variation to the clouds!
I made this sprite sheet with 5 different clouds to float by:

cloud.jso:
{
"frames": {
	"cloud.png": {
		"frame": {"x":0, "y":0, "w":100, "h":72},
		"spriteSourceSize": {"x":0,"y":4,"w":100,"h":80},
		"sourceSize": {"w":100,"h":80}
	},
	"cloud_2.png": {
		"frame": {"x":0, "y":73, "w":95, "h":77},
		"spriteSourceSize": {"x":4,"y":3,"w":100,"h":80},
		"sourceSize": {"w":100,"h":80}
	},
	"cloud_3.png": {
		"frame": {"x":96, "y":73, "w":94, "h":77},
		"spriteSourceSize": {"x":1,"y":3,"w":100,"h":80},
		"sourceSize": {"w":100,"h":80}
	},
	"cloud_4.png": {
		"frame": {"x":95, "y":151, "w":94, "h":56},
		"spriteSourceSize": {"x":0,"y":6,"w":100,"h":80},
		"sourceSize": {"w":100,"h":80}
	},
	"cloud_5.png": {
		"frame": {"x":0, "y":151, "w":94, "h":76},
		"spriteSourceSize": {"x":0,"y":2,"w":100,"h":80},
		"sourceSize": {"w":100,"h":80}
	}

},
"meta": {
	"image": "clouds.png",
	"size": {"w": 191, "h": 228},
	"scale": "1"
}
}
I made as extra a sprite changer inside our clouds.js
Therefor I had to adjust these codes:
//helpers/references.js
...
var artifactsAssets = {
    clouds: {
        sheet: '_assets/clouds.json',
        frames: [
            'cloud_1.png',
            'cloud_2.png',
            'cloud_3.png',
            'cloud_4.png',
            'cloud_5.png',
        ],
    },
};
...
//artifacts/cloud.js
export default class cloud{
    constructor(scene, sheetInformation, xPos, yPos){
        this.textures = PIXI.Loader.shared.resources[sheetInformation.sheet].textures;
        this.frames = sheetInformation.frames;

        this.cloud = new PIXI.Sprite(this.randomSprite);
        this.cloud.x = xPos;
        this.cloud.y = yPos;
        scene.addChild(this.cloud);

        this.speed = 0;
        this.randomize();
    }

    get randomSprite(){
        // get random sprite
        return this.textures[this.frames[Math.floor(Math.random() * this.frames.length)]];
    }

    randomize(){
        // random speed from 0.5 to 1
        this.speed = (Math.random() * 0.5) + 0.5;
        this.cloud.scale.set((Math.random() * 1) + 0.5);
        this.cloud.texture = this.randomSprite; // set sprite
    }

    update(){
        this.cloud.x += this.speed;
        if(this.cloud.x > 1000){
            this.cloud.x = -1000;
            this.randomize();
        }
    }

    destroy(){
        this.cloud.destroy();
    }
}
In randomSprite() method I return a random texture from our frames by getting a random integer between 0 and the length of our frames (5). Math.floor makes sure it will return an integer and not 1.2539 for example because otherwise the frames array will not understand what to return.
End result:
That is it for this episode!
In case you couldn’t follow something and really want to see the full script feel free to check my github repository for this episode: https://github.com/jscotty/html5_buildserie/tree/EP3_SpritesheetsAnimations
You can also find part 1 and 2 in this repository by simply checking the branches tab.
hope you’ve enjoyed this episode! If you have any questions, feel free to ask in the comments or message me on Instagram.
Greetings,
-Justin Scott
web-dl
Way cool! Some very valid points! I appreciate you penning this post plus the rest of the website is very good. Bella Ingra Crosse