Hello readers!
Welcome to part 5 of HTML5 build series! We will now create an animation system using tweening and easing!
I personally love writing animations. It always feels so good when something you wrote, maybe for hours and the end result (hopefully) being so smooth really makes me enjoying life. Even though you might end up tweaking your animation pixel to the left, pixel up, pixel down etc. If it is finished, the relieve feels great!
A way of animating I like to use often in code is tweening and easing. But what is tweening and how do we ease it?
Tweening comes from the word Inbetweening. The system will tween an object in between point A and B. More narrow explanation can always been read on wikipedia https://en.wikipedia.org/wiki/Inbetweening. 🙂
But how do we ease this?
We can ease a tween using multiple formulas:
- Linear
- Sinusoidal
- Cubic
- Quintic
- Circular
- Elastic
- Quadratic
- Quartic
- Exponential
- Back
- Bounce
Each formula has its own behaviour to create our desired animation.
Lets start
To make it easier to explain and show plain animations I stripped out everything from current project and started a new project with only the scene management and player classes. This way this project can hopefully also be used by people outside of this build series and use the formulas in their own project.
In this episode I will only explain all the new classes I made and next episode we will implement and use them in our current project.
Lets now dive into the formulas! 😀
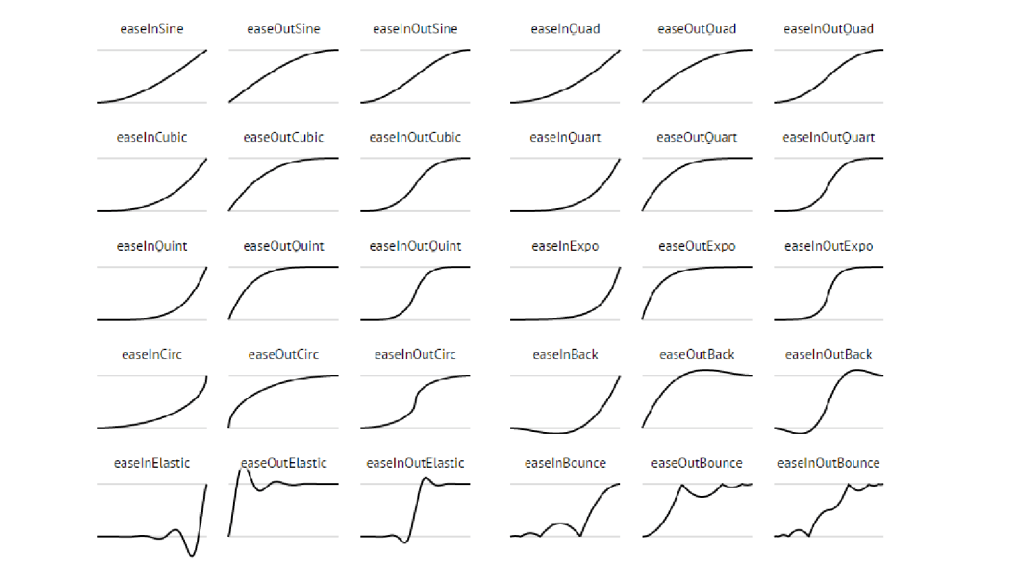
See here the graphs of all formulas we will implement. Besides linear which is a straight line from A to B.
To access all formulas we will create a class with static methods. This way all formulas are reachable through any class.
export default class Ease {
    //TODO: static formulas
}
Each formula must contain 4 parameters:
- t = time, current time spend in animation.
- b = begin, the start point of our animation.
- c = change, the end point of our animation.
- d = duration, the length of the animation
t and d can be either frames or seconds. As long as both are in same format. I will use seconds in this episode.
Each formula I provided an example gif of an animation used with (each) formula.
Linear

Linear is the most easiest of all because it is a straight line from A to B. But it also makes it the most easiest to explain.
// Linear

static linear (t, b, c, d){
    return c * t / d + b;
}
This might looks very magical and maybe very strange, but lets split this out a little bit.
I will split this in 4 frames of 5 seconds and go from 40 to 60. this means we will take steps of 1.25 and the change will be 20 (60 – 40 = 20, so 20 is the change we want to apply).
(20 * 1.25 / 5 + 40 = 45), (20 * 2.5 / 5 + 40 = 50), (20 * 3.75 / 5 + 40 = 55), (20 * 5 / 5 + 40 = 60)!
As you can see we make a step of 5 each frame. This is because 20 / 4 frames is 5 so, if we want to apply 20 over 4 frames we should apply 5 each frame.
The other examples will might be a little bit more advanced and I am not going to deep dive in all of them. But if you are really interested in following each step I’d say, open a notebook or notepad and try creating step by step scenarios like I did in my example. 🙂
Sinusoidal
// Sinusoidal

static sineIn (t, b, c, d){
    return -c * Math.cos(t / d * (Math.PI / 2)) + c + b;
}

static sineOut (t, b, c, d){
    return c * Math.sin(t / d * (Math.PI / 2)) + b;
}

static sineInOut (t, b, c, d){
    return -c / 2 * (Math.cos(Math.PI * t / d) - 1) + b;
}
This is a challenging one to test, but also a lot of fun! I will split out sineIn method: I will write PI as 3.14 but will use PI on my calculator. Again I will split this in 4 frames of 5 seconds and go from 40 to 60.
(-20 * sin(1.25 / 5 * (3.14 / 2)) + 40 = 41.52..), (-20 * sin(2.5 / 5 * (3.14 / 2)) + 40 = 45.86..), (-20 * sin(1.25 / 5 * (3.14 / 2)) + 40 = 52.35..), (-20 * sin(1.25 / 5 * (3.14 / 2)) + 40 = 60)!
As you can see now we start with a slow process and the value starts to change significantly higher each frame.
Cubic
// Cubic

static cubicIn (t, b, c, d){
    t /= d;
    return c * t * t * t + b;
}

static cubicOut (t, b, c, d){
    t /= d;
    t--;
    return c * (t * t * t + 1) + b;
}

static cubicInOut (t, b, c, d){
    t /= d / 2;
    if (t < 1) return c / 2 * t * t * t + b;
    t -= 2;
    return c / 2 * (t * t * t + 2) + b;
}
Quintic

// Quintic

static quintIn (t, b, c, d){
    t /= d;
    return c * t * t * t * t * t + b;
}

static quintOut (t, b, c, d){
    t /= d;
    t--;
    return c * (t * t * t * t * t + 1) + b;
}

static quintInOut (t, b, c, d){
    t /= d / 2;
    if (t < 1) return c / 2 * t * t * t * t * t + b;
    t -= 2;
    return c / 2 * (t * t * t * t * t + 2) + b;
}
Circular
//Circular

static circIn (t, b, c, d){
    t /= d;
    return -c * (Math.sqrt(1 - t * t) - 1) + b;
}

static circOut (t, b, c, d){
    t /= d;
    t--;
    return c * Math.sqrt(1 - t * t) + b;
}

static circInOut (t, b, c, d){
    t /= d / 2;
    if (t < 1) return -c/2 * (Math.sqrt(1 - t * t) - 1) + b;
    t -= 2;
    return c / 2 * (Math.sqrt(1 - t * t) + 1) + b;
}
Elastic
// Elastic

static elasticIn (t, b, c, d){
    var ts = (t /= d) * t;
    var tc = ts * t;
    return b + c * (33 * tc * ts + -59 * ts * ts + 32 * tc + -5 * ts);
}

static elasticOut (t, b, c, d){
    var ts = (t /= d) * t;
    var tc = ts * t;
    return b + c * (33 * tc * ts + -106 * ts * ts + 126 * tc + -67 * ts + 15 * t);
}

static elasticInOut (t, b, c, d){
    var ts = (t /= d) * t;
    var tc = ts * t;
    return b + c * (45.345 * tc * ts + -111.24 * ts * ts + 88.495 * tc + -23.2 * ts + 1.6 * t);
}
Quadratic
// Quadratic

static quadIn (t, b, c, d){
    t /= d;
    return c * t * t + b;
}

static quadOut (t, b, c, d){
    t /= d;
    return -c * t * (t - 2) + b;
}

static quadInOut (t, b, c, d){
    t /= d / 2;
    if (t < 1) return c / 2 *t * t + b;
    t--;
    return -c/2 * (t*(t-2) - 1) + b;
}
For quadratic we must use normalized time value instead. This is why we use t =/ d (2 / 4 = 0.5). 🙂
Lets try one out! I will split out quadOut method. Again I will split this in 4 frames of 5 seconds and go from 40 to 60.
((t = 1.25 / 5 = 0.25) -20 * 0.25 * (0.25 – 2) + 40 = 48.75), ((t = 2.5 / 5 = 0.5) -20 * 0.5 * (0.5 – 2) + 40 = 55), ((t = 3.75 / 5 = 0.75) -20 * 0.75 * (0.75 – 2) + 40 = 58.75), ((t = 5 / 5 = 1) -20 * 1 * (1 – 2) + 40 = 60)!
As you can see now, we start quick with a adding of 8.75 which then reduces slowly to adding 6.25, reduces again by adding 3.75 and finally slows down to adding 1.25. This can be very usefull for something like kicking a ball which has quick impact and slowly reduces speed.
Quartic
// Quartic

static quartIn (t, b, c, d){
    t /= d;
    return c * t * t * t * t + b;
}

static quartOut (t, b, c, d){
    t /= d;
    t--;
    return -c * (t * t * t * t - 1) + b;
}

static quartInOut (t, b, c, d){
    t /= d / 2;
    if (t < 1) return c / 2 * t * t * t * t + b;
    t -= 2;
    return -c / 2 * (t * t * t * t - 2) + b;
}
Exponential
// Exponential

static expoIn (t, b, c, d){
    return c * Math.pow( 2, 10 * (t/d - 1) ) + b;
}

static expoOut (t, b, c, d){
    return c * ( -Math.pow( 2, -10 * t/d ) + 1 ) + b;
}

static expoInOut (t, b, c, d){
    t /= d/2;
    if (t < 1) return c/2 * Math.pow( 2, 10 * (t - 1) ) + b;
    t--;
    return c/2 * ( -Math.pow( 2, -10 * t) + 2 ) + b;
}
Back
// Back

static backIn (t, b, c, d){
    var ts = (t /= d) * t;
    var tc = ts * t;
    return b + c * (4 * tc + -3 * ts);
}

static backOut (t, b, c, d){
    var ts = (t /= d) * t;
    var tc = ts * t;
    return b + c * (4 * tc + -9 * ts + 6 * t);
}

static backInOut (t, b, c, d){
    var ts = (t /= d) * t;
    var tc = ts * t;
    return b + c * (20.9475 * tc * ts + -54.7425 * ts * ts + 43.895 * tc + -9.1 * ts);
}
Bounce
// Bounce

static bounceIn (t, b, c, d){
    return c - Ease.bounceOut (d - t, 0, c, d) + b;
}

static bounceOut (t, b, c, d){
	if ((t /= d) < (1 / 2.75)) {
		return c * (7.5625 * t * t) + b;
	} else if (t < (2 / 2.75)) {
		return c * (7.5625 * (t -= (1.5 / 2.75)) * t + 0.75) + b;
	} else if (t < (2.5 / 2.75)) {
		return c * (7.5625 * (t -= (2.25 / 2.75)) * t + 0.9375) + b;
	} else {
		return c * (7.5625 * (t -= (2.625 / 2.75)) * t + 0.984375) + b;
	}
}

static bounceInOut (t, b, c, d){
    if (t < d / 2) {
        return Ease.bounceOut (t * 2, 0, c, d) * 0.5 + b;
    }
	return Ease.bounceOut (t * 2 - d, 0, c, d) * 0.5 + c * 0.5 + b;
}
If you add all these formulas to the Ease class, you have gathered all animation formulas to one place. So lets implement them.
Implementation
Now we know how the frames calculation is done, we should make a tween.
A tween will animate a object. A tween class can look like this:
// helpers/tween.js

export default class Tween {
    // target and end myst contain x and y properties.
    constructor(target, end, duration, animateX, animateY, ease){
        this.target = target;
        // creating a start to cache the target x and y. Because we need to remember the begin data.
        this.start = {x: target.x, y: target.y};
        this.end = end;
        // creating change because we need to remember the change we want to apply for our formulas
        this.change = {x: end.x - target.x, y: end.y - target.y};
        // duration in seconds.
        this.duration = duration;

        // ease is any of the formalas we created earlier
        this.ease = ease;

        // boolean to enable x and/or y values to animate
        this.animateX = animateX;
        this.animateY = animateY;

        this.time = 0;
        this.destroyed = false;
    }

    update(delta){
        this.time += delta;
        if(this.animateX){
            this.target.x = this.ease(this.time / 60, this.start.x, this.to.x, this.duration);
        }
        if(this.animateY){
            this.target.y = this.ease(this.time / 60, this.start.y, this.to.y, this.duration);
        }
        // converting time to seconds
        if((this.time / 60) >= this.duration){
            // snapping target values in case a calculation was a little bit off or over.
            if(this.animateX){
                this.target.x = this.end.x;
            }
            if(this.animateY){
                this.target.y = this.end.y;
            }
            this.destroy();
        }
    }

    destroy(){
        this.destroyed = true;
    }
}
As you can see I made the change value end – target. This is so the constructor can contain the end value and not the change we want to apply. For example: I want an object to tween from 40 to 60 (60(end) – 40(start) = 20). Instead of saying Tween(object, 20..) We can say Tween(object, 60…) this way we can easy keep track of where our object will animate to.
To manage a tween so we can update it and run multiple animations at the same time and remove a tween when it is finished. We need a manager to manage this. Instead of creating a TweenManager I named this class Tweener. This class will be easy to write down and will use static methods so we can call it any time without instantiating. This means we only need 1 Tweener in our whole project, which can handle all tweens.
See the class:
// helpers/tweener.js

import Tween from './tween.js';

export default class Tweener {
    // initialize to create the tween array.
    static init(){
        this.tween = [];
    }

    // only animating x value
    static startTweenX(target, end, duration, ease){
        var e = {x: end, y: 0};
        var tween = new Tween(target, e, duration, true, false, ease);
        this.tween.push(tween);
        return tween;
    }

    // only animating y value
    static startTweenY(target, end, duration, ease){
        var e = {x: 0, y: end};
        var tween = new Tween(target, e, duration, true, false, ease);
        this.tween.push(tween);
        return tween;
    }

    // animating x and y
    static startTween(target, end, duration, ease){
        var tween = new Tween(target, end, duration, true, false, ease);
        this.tween.push(tween);
        return tween;
    }

    // updating all tweens
    static update(delta){
        var self = this;
        this.tween.forEach(function (item){
            if(item.destroyed){
                // item is already finished, so lets remove it from the array.
                var index = self.tween.indexOf(item);
                if(index > -1){
                    self.tween.splice(index, 1);
                }
                return;
            }
            // update tween.
            item.update(delta);
        });
    }
}
In this class we handle creating and updating tweens.
As you can see I am using a forEach loop in update method. I used a forEach loop instead of a for loop because we are deleting tweens from the array in the update. This means if we first had 5 tweens and at tween 3 I remove one. We will most likely get an index out of range exception.
To use this Tweener we only have to add it to our main class and then call it where ever you want to start a tween!
import SceneManager from './scenes/sceneManager.js';
import Linear from './scenes/linear.js';
import Sinusoidal from './scenes/sinusoidal.js';
import Cubic from './scenes/cubic.js';
import Quintic from './scenes/quintic.js';
import Circular from './scenes/circular.js';
import Elastic from './scenes/elastic.js';
import Quadratic from './scenes/quadratic.js';
import Quartic from './scenes/quartic.js';
import Exponential from './scenes/exponential.js';
import Back from './scenes/back.js';
import Bounce from './scenes/bounce.js';
import MathHelper from './helpers/mathhelper.js';
import Tweener from './helpers/tweener.js'; // accessing tweener
import { sceneStates, uiAssets, characterAssets } from './helpers/references.js';

const width = 800;
const height = 600;

const renderer= new PIXI.Application({
    width: width, height: height, backgroundColor: 0xffffff, resolution: window.devicePixelRatio || 1,
});
document.body.appendChild(renderer.view);

Tweener.init(); // initialize tweener

PIXI.Loader.shared
.add(uiAssets.mediumPinkButtons.sheet)
.add(uiAssets.easingExamples.sheet)
.add(characterAssets.characterAnimation.sheet)
.load(function(){
    var sceneManager = new SceneManager(renderer);
    // created example scenes for each formula.
    sceneManager.addScene(new Linear());
    sceneManager.addScene(new Sinusoidal());
    sceneManager.addScene(new Cubic());
    sceneManager.addScene(new Quintic());
    sceneManager.addScene(new Circular());
    sceneManager.addScene(new Elastic());
    sceneManager.addScene(new Quadratic());
    sceneManager.addScene(new Quartic());
    sceneManager.addScene(new Exponential());
    sceneManager.addScene(new Back());
    sceneManager.addScene(new Bounce());

    sceneManager.renderScene(sceneStates.linear);

    renderer.ticker.add(function update(delta){
        sceneManager.update(delta);
        Tweener.update(delta); // update tweener!
    });
});

var resize = () => {
    const scaleFactor = MathHelper.clamp(Math.min(window.innerWidth / width, window.innerHeight / height), 0, 1);
    var newWidth = width * scaleFactor;
    var newHeight = height * scaleFactor;

    renderer.view.style.width = newWidth + 'px';
    renderer.view.style.height = newHeight + 'px';
};

window.addEventListener('resize', resize, false);
resize();
I created for each formula an example scene. You can dive into these classes in my repository if you like to: https://github.com/jscotty/html5_tweening.
To start a tween we can simply say:
import Ease from '../helpers/ease.js';
import Tweener from '../helpers/tweener.js';

var player = { x: 10, y: 10 };
var duration = 5; // 5 seconds
var targetX = 100; // move x to x postion 100.
Tweener.startTweenX(player, targetX, duration, Ease.bounceIn);
Extra
As a small extra I’d like to add one little feature. We can also fire an event when our animation has finished.
As you might have noticed I’ve already returned the Tween in Tweener.StartTween this means we can add something to the tween as well.
export default class Tween {
    constructor(target, end, duration, animateX, animateY, ease){
        ...
    }

    update(delta){
        ...
        // reached end.
        if((this.time / 60) >= this.duration){
            ...
            if(this.onCompleteCallback != null){
                this.onCompleteCallback.call();
            }
            ...
        }
    }

    onComplete(onCompleteCallback){
        // set call back when tween has finsihed.
        this.onCompleteCallback = onCompleteCallback;
    }

    destroy(){
        ...
    }
}
With this we can fire another tween after a tween has finished, you can open a menu after a tween has finished, you can move scene after a tween has finished, you can name it!
To use this it will look like this:
import Ease from '../helpers/ease.js';
import Tweener from '../helpers/tweener.js';

var player = { x: 10, y: 10 };
var duration = 5; // 5 seconds
var targetX = 100; // move x to x postion 100.
Tweener.startTweenX(player, targetX, duration, Ease.bounceIn).onComplete(function (){
            // TODO: do something!
        });
In my repository you will see I use this to animate the player back to previous position.
I did not re invented the wheel and used http://robertpenner.com/easing/ for finding all my information about tweening and easing formulas. I hope I made it a little bit easier to understand so everyone can work on making their tween animations. 🙂
To check the whole tween project feel free to look at https://github.com/jscotty/html5_tweening.
This is it for this episode 😀 , next episode we will implement this in our current project state!
hope you’ve enjoyed this episode! If you have any questions, feel free to ask in the comments!
Greetings,
-Justin Scott
Leave a Reply