


Hello dear readers,
I would like to welcome everyone to my first topic blog post.
If you have been surfing on my website and seen my portfolio, you’ve might noticed that I made a mandala drawing application in 2015 using Java.

I only posted in this example a piece of code which is a 2D algorithm for finding position in a circle. I used this algorithm from wikipedia about rotation matrix
Wikipedia – Rotation matrix
I find this a really interesting topic and like to create something cool with this information with you guys!
So let’s begin! ?
What are we going to make.
You might could have guessed what we are going to make by the tumbnail of this post.
We will create a tool to generate 2D circled objects and 3D worlds, using Unity3D engine scripting in C#
We will begin with creating a custom editor script to control our tool. The custom editor will not be long and will be able to control 2D and 3D generations.
After setting up the custom editor we will start with the 2D circle and following up the 3D sphere.
After implementing the 3D sphere, we will have some fun with the tool we created ?.
Setup base
To setup a custom editor we should start with creating a base . We will setup two classes for the visualization (serialized properties, initialization and settings) and the functionalities.
For the functionalities we create a derived class so if we are able to easily use this in any class we like to.
using UnityEngine;

/*
* @author 01001010 01010011 01000010
*/

public class CircleGenerator {

	private const float CIRCLE_ANGLE = 360.0f;

	[System.Serializable] // to make it able to be visible in inspector.
	public struct CircleGenerationSettings {
		[Header("General")]
		public float radius;
		public float angleCorrection;
		public GameObject[] prefab; // using an array to have some fun with different objects :)

		[Header("2D")]
		public int amount;

	}

	public void GenerateCircle2D (CircleGenerationSettings settings, Transform parent = null) {
		// TODO implement 2D circle
	}

	public void GenerateCircle3D (short[] set, float index, float length, CircleGenerationSettings settings, Transform parent = null) {
		// TODO implement 3D sphere
	}
}
In this class we will control the circle generation. We only do have to implement the rotation matrices and uses the information we will get from these to spawn our object in a circle.
For the visualization we will create a MonoBehaviour class so we can use this class as base for our custom editor.
using UnityEngine;
using CircleGenerationSettings = CircleGenerator.CircleGenerationSettings; // import struct from circle generator

/*
* @author 01001010 01010011 01000010
*/

[ExecuteInEditMode] // We do not want to run our application everytime ;)
public class CircleExample : MonoBehaviour {
	// Normally we could better use [SerializedField] private... but, because we want to create a custom editor. Let's take it easy.
	public CircleGenerationSettings settings = new CircleGenerationSettings() {
		amount = 20, radius = 50, angleCorrection = 0
	};
	private CircleGenerator generator = new CircleGenerator();

	public void Generate2D () {
		RemoveAllChildren();
		generator.GenerateCircle2D(settings, this.transform);
	}

	public void Generate3D () {
		RemoveAllChildren();
		// set index and length to 0, will be filled in after we implemented the 3D rotation matrix
		generator.GenerateCircle3D(null, 0,0, settings, this.transform);
	}

	private void RemoveAllChildren () {
		for (int i = transform.childCount - 1 ; i >= 0 ; i--) {
			GameObject.DestroyImmediate(transform.GetChild(i).gameObject);
		}
	}
}
This class is and will be very basic and is actually only created so we can use Unity3D custom inspector.
Custom Editor tool
If you are familiar with creating Custom Editors you will already know this, but just to those who do not know and end up with errors while building. Put this script in a folder called /Editor this way Unity will skip this script while building and will save a headache ?.
using UnityEngine;
using UnityEditor;

/*
* @author 01001010 01010011 01000010
*/

//Remember to put me in a /Editor folder :)
[CustomEditor(typeof(CircleExample))]
[CanEditMultipleObjects]
public class CircleExampleEditor : Editor {
	private SerializedObject m_Object;
	private SerializedProperty m_Property;

	void OnEnable () {
	}

	public override void OnInspectorGUI () {
		CircleExample circle = (CircleExample) target;

		DrawDefaultInspector(); // draw public / serialized properties of CircleExample.cs


		// when button clicked, call method
		if (GUILayout.Button("Generate world 2D (circle)")) {
			circle.Generate2D();
		}
		if (GUILayout.Button("Generate world 3D (sphere)")) {
			circle.Generate3D();
		}
	}
}
Now we have finished setting up our base. We have a custom editor with two buttons to create 2D and 3D spawned objects in a circle/sphere shape.
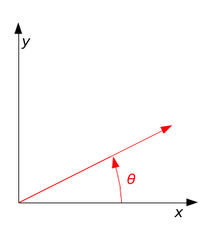
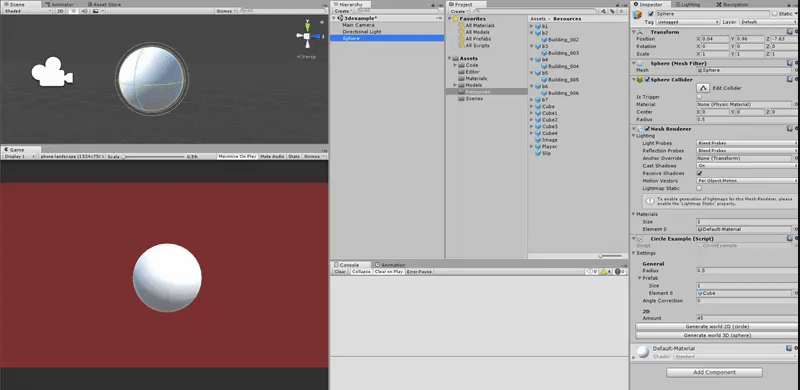
If you’ll drag CircleExample.cs to any gameobject, the inspector should look like this.
2D circle
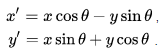
The algorithm for finding the positions within a 2D matrix is x = x(Cosine of theta) – x(Sinus of theta) and y = y(Sinus of theta) + y(Cosine of theta)
The only thing is, we do not need this algorithm completely because we will only use the radius. Then we can simply use the standard circle algorithm called trigonometry.

Now we only need to add the radius, and our algorithm will look like this:
x = settings.radius * Mathf.Sin(angle);
y = settings.radius * Mathf.Cos(angle);
Now we know what our algorithm is, it will be time to implement this algorithm in our CircleGenerator.cs
public void GenerateCircle2D (CircleGenerationSettings settings, Transform parent = null) {
		// calculate the angle per spot. if we have for example 10 objects around a circle of 360 degrees the angle per spot will be 36 * index.
		var anglePerSpot = CIRCLE_ANGLE / settings.amount;
		for (int i = 0 ; i < settings.amount ; i++) {
			//calculate position
			float a = anglePerSpot, angle, x, y;
			a = (i * anglePerSpot);
			angle = (a * Mathf.PI / (CIRCLE_ANGLE / 2)); // Could also use ' a * Mathf.Deg2Rad '
			// no need to add center because we can use unity local position.
			x= (float) (settings.radius * Mathf.Sin(angle));
			y= (float) (settings.radius * Mathf.Cos(angle));

			var obj = GameObject.Instantiate(settings.prefab[0], parent); // for now using first index of the prefab array. 'Random.Range(settings.prefab.length) is also fun ;)'
			obj.transform.localPosition = new Vector3(x, y, 0);

			// rotate
			Vector3 rot = obj.transform.eulerAngles;
			rot.z = -(Mathf.Rad2Deg * angle) - settings.angleCorrection;
			obj.transform.eulerAngles = rot;
		}
	}
Lets go through it.
We begin by calculating what the angle per spot will be, so the objects will be perfectly aligned in a circle.
With knowing the angle per spot we can begin our implementation with creating a for loop to go through the amount of objects we want to have in a circle.
First we define our needed variables.
– a = the angle we want to this object to be in.
– angle = a transformed to radians.
– x = x position
– y = y position
Second we implement the algorithm of finding the positions around our given radius. (I cast this to float but this is not necessarily but it is something I am always doing automatically ?)
In the end we will instantiate an object on our desired position with the desired rotation angle.
We use localPosition so the parent will always be on zero position which causes that we do not need to add the parent position to our algorithm and using Unity3D optimally.
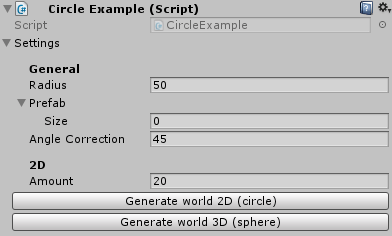
Now lets test it!
In this example we can find the radius of this circle very easy. The radius is image width / 2 which makes it 200. I could also do this by reading the image width data and divide it by two in code. But this is more a tool like application and gives for example designers more flexibility to create the object exactly how they want it. ?
Now we can create a 2D circle of objects using 2D rotation matrix! ? That was fun! But we are not done yet!
Let’s take this a step further to 3D generation.
3D sphere
To generate a 3D sphered obect of objects ? we can actually use the same algorithm as for 2D!
Only will we add more rows of objects around the Z axis. Just like this picture:

But how do we calculate the radius of each row?
Well let me show the code first. ?
First we will edit CircleExample.cs to:
using UnityEngine;
using CircleGenerationSettings = CircleGenerator.CircleGenerationSettings; // import enum from circle generator

/*
* @author 01001010 01010011 01000010
*/

[ExecuteInEditMode] // We do not want to run our application everytime ;)
public class CircleExample : MonoBehaviour {

	private static readonly short[][] preset = new short[][] { // presetting the amount and index of objects per row from up to down.
		new short[] { 0 },
		new short[] { 0,0,0,0 },
		new short[] { 0,0,0,0,0 },
		new short[] { 0,0,0,0,0 },
		new short[] { 0,0,0,0,0,0,0,0,0,0,0 },
		new short[] { 0,0,0,0,0 },
		new short[] { 0,0,0,0,0 },
		new short[] { 0,0,0,0 },
		new short[] { 0 },
	};
	public CircleGenerationSettings settings = new CircleGenerationSettings() {
		amount = 20, radius = 50, angleCorrection = 45.0f
	};
	private CircleGenerator generator = new CircleGenerator();

	public void GenerateWorld2D () {
		RemoveAllChildren();
		generator.GenerateCircle2D(settings, this.transform);
	}

	public void GenerateWorld3D () {
		RemoveAllChildren();

		for (int i = 0 ; i < preset.Length ; i++) { // looping through preset
			generator.GenerateCircle3D(preset[i], i, preset.Length - 1, settings, this.transform); // generate each preset
		}
	}

	private void RemoveAllChildren () {
		for (int i = transform.childCount - 1 ; i >= 0 ; i--) {
			GameObject.DestroyImmediate(transform.GetChild(i).gameObject);
		}
	}
}
To create a sphere we need different amount of objects per row because every row has a different radius. I decided for this example to create an easy multidimensional byte array to loop through the length of each array. You could also use a generated text files or any other way to count objects per row, but this is also one way to do it ? (but not really designer’s friendly).
Now we have created a preset and generating every row from our tool, we can finally implement the 3D rotation matrix.
public void GenerateCircle3D (short[] set, float index, float length, CircleGenerationSettings settings, Transform parent = null) {
		var anglePerSpot = CIRCLE_ANGLE / set.Length;
		for (int i = 0 ; i < set.Length ; i++) {
			if (set[i] < 0) {
				continue;
			}
			//calculate position
			float a = anglePerSpot, angle, x, y, z, multiplier;
			a = (i * anglePerSpot);
			angle = (a * Mathf.PI / (CIRCLE_ANGLE / 2));

			// finding sphere cap radius
			var radius = settings.radius;
			float height = (float) (((index / length) - 0.5f))* (settings.radius*2);
			radius = Mathf.Sqrt((radius * radius) - (heigth * heigth));

			x = (float) (radius * Mathf.Sin(angle));
			y = (float) (radius * Mathf.Cos(angle));
			z = height;

			var obj = GameObject.Instantiate(settings.prefab[set[i]], parent);
			obj.transform.localPosition = new Vector3(x, y, z);

			// rotate
			Vector3 objectDistance = (obj.transform.position - parent.transform.position).normalized;
			Vector3 targetUp = parent.transform.up;
			Quaternion targetRotation = Quaternion.FromToRotation(targetUp, objectDistance) * obj.transform.rotation;
			obj.transform.rotation = targetRotation;
		}
	}
Let’s go through it.
Since we have to find the radius of each row, there are a few noticeable changes in the code.
In the variable initialization I have added height, which will be a value between -radius -> 0 -> radius so we can determine on which part of the sphere want to place objects. This is part of the sphere cap formula I am going to explain right now.
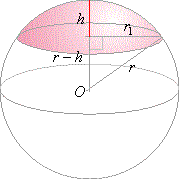
Here an interesting video about how to find the volume of a sphere cap.
Now we have a (radius) and c (height) we can find r1 (b) by using Square root of a2 + c2
To calculate the z position is luckily the same as height, since that is the place we want to calculate the radius from 😉
As rotation we use the unity Quaternion methods to rotate the object upwards to the center of its target which is in our example the center of a sphere.
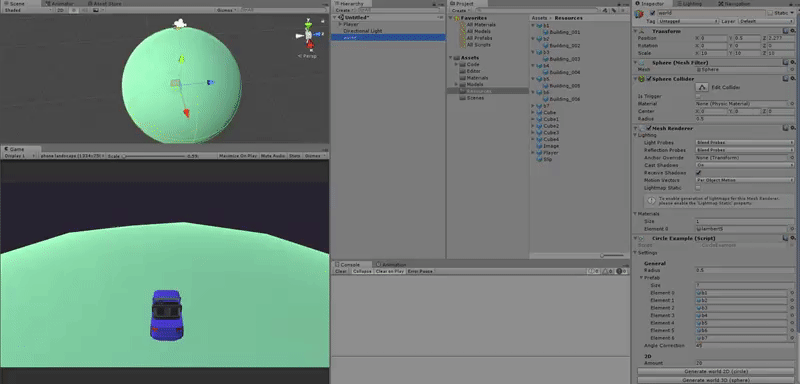
Now let’s test it!
Now we can have some fun ?
Finishing touch
There are different things we can do to make this tool useful.
But I decided to add my car from Ludum Dare 38 – Game Jam to a generated world!
I imported the car codes, car model and building models into the project and started playing around!
Result:
There are still plenty of things which would be very interesting to add!
You could for example add an extra row of objects, since we are creating the rows only around the z-axis, you are also able add them around the x / y axis!
You can also play around with the building rotations, row distances and radiuses!
There are many features to create/add to this tool. So it is up to you what you are going to make with this base!
(I’d really like it if you share your creations based on this tool with me)
I hoped you liked it!
For any questions, please leave a comment or contact me through one of the social links in top/bottom of my website ?
Thank you very much for reading!
– Justin Scott.
Download source at: https://github.com/jscotty/CirclesAndSpheres
Becky
Very professional ???
SannSnary
ey
SannySnary
Make a more new posts please 🙂
___
Sanny